Claythoria Visualizer: Documentation
Claythoria Visualizer is a realtime application for building audio reactive visuals. It runs as a standalone application and as a VST3 or AU plugin, and it renders natively on the GPU (Metal on macOS, Direct3D on Windows).
The program has one organizing concept. Objects draw, modulators react, and connections wire a modulator to any knob on any object. A scene is made up of objects, modulators, and the connections between them. Effects and deforms attach to objects (or to groups/screen) and their parameters may also be connected to modulators.
Requirements
- OS: macOS 12 or later, Windows 10 or later.
- Recommended: an Apple Silicon Mac, or a Windows machine with an RTX 2060 class GPU.
- Formats: standalone on both platforms, VST3 on both platforms, AU on macOS.
Install
Download the installer from claythoria.com. On macOS run the .dmg. On Windows run the .exe installer.
Saved work is stored in the Documents folder:
Documents/Claythoria/Visualizer/Presetsholds scene presets (.vizpreset).Documents/Claythoria/Visualizer/Objectsholds object presets (.vizobject).
Change these folders in Settings > Presets.
Sign In
Click Sign in..., and follow the prompts using a browser window opened to claythoria.com. The first sign in on an account activates the free trial, if one is available. A trial renders with a Trial Mode watermark. A purchase removes it.
An account can be signed in on a limited number of computers.
Quickstart Guide
This chapter builds an example scene. Later chapters are references.
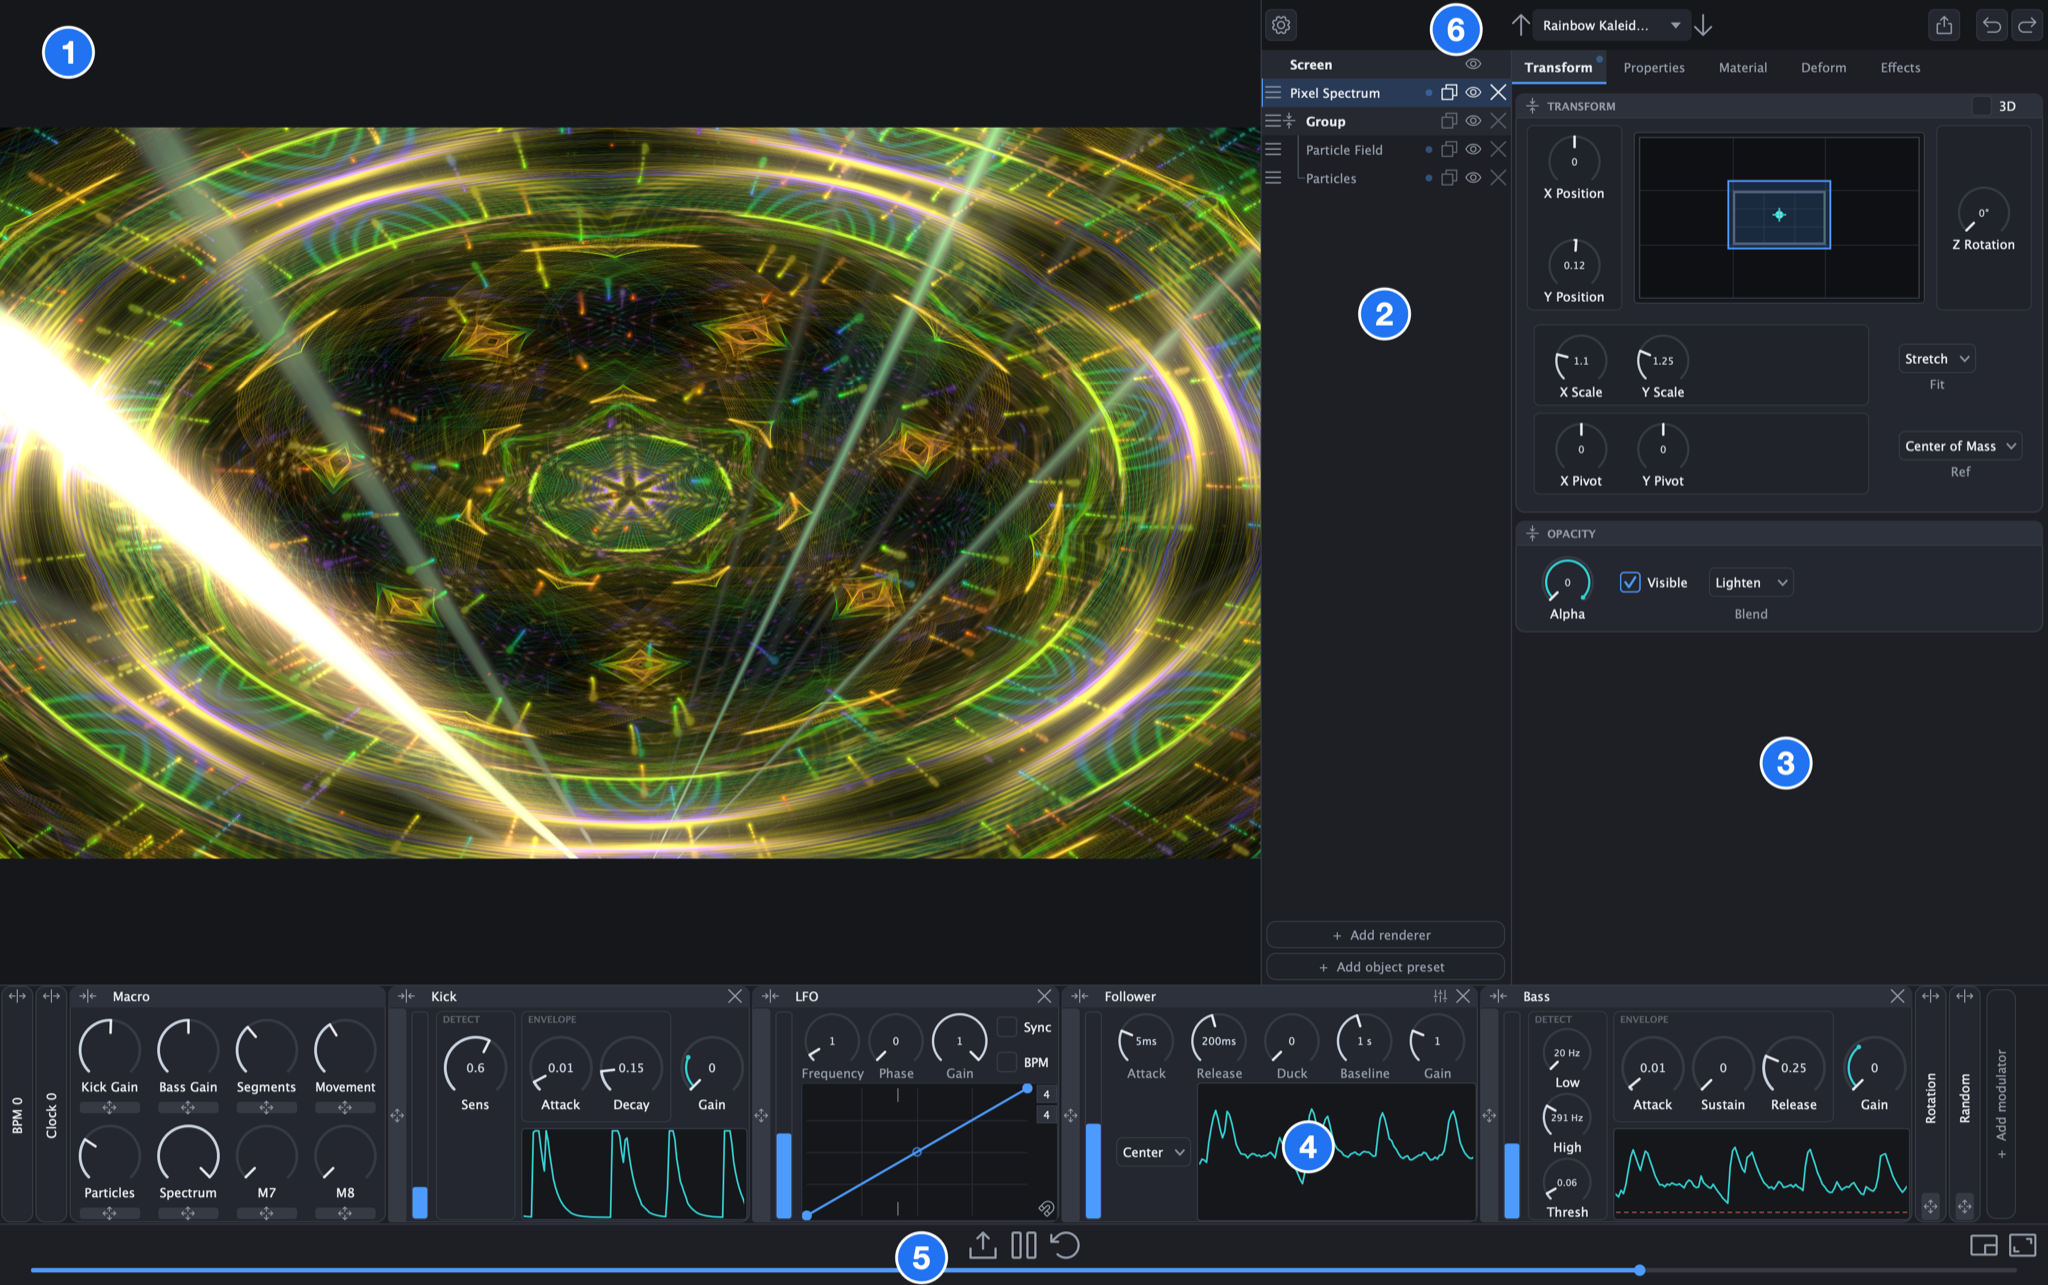
The main window has six areas. The display (1) shows the scene. The object tree (2) lists objects in draw order. The properties panel (3) shows the parameters of the selected object. The modulator rack (4) holds the modulators. The transport bar (5) has the load button, play and pause, the popout button, and the editor toggle. The settings bar (6) has the preset arrows and browser, undo and redo, the render button, and settings.
- Load audio. Click the load button in the transport bar and select a music file. To use the system's audio output, turn on Settings > Audio > Listen to computer audio.
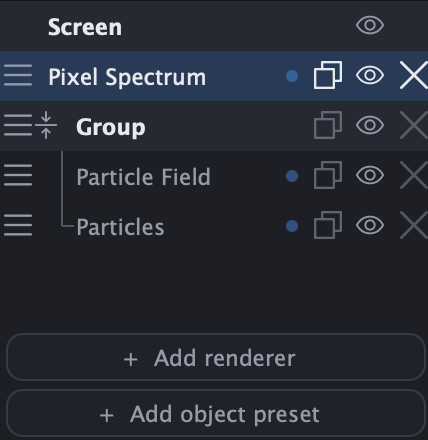
- Clear the scene. If there are unwanted renderers in the scene, delete them using the button in the object tree.
- Add a renderer. Click Add renderer above the object tree. Select Spectrum.
- Adjust it. With Spectrum selected, open the Properties tab and adjust Smooth and Tilt. Open the Material tab and select a color or a gradient in the Color section.
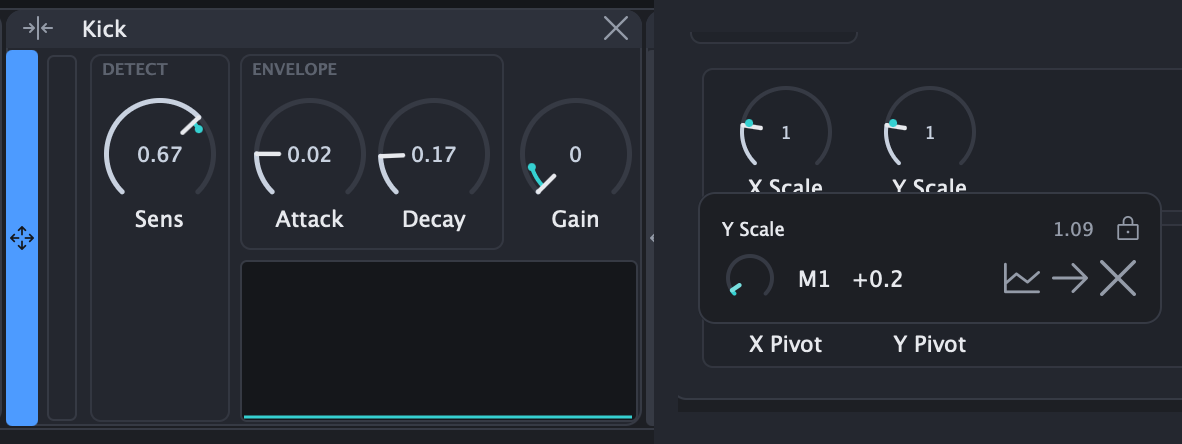
- Add a modulator. Click the add button at the end of the rack and select Kick.
- Connect. Drag the bar on the left edge of the Kick module onto the X Scale knob on the Spectrum's Transform tab. The knob now follows the kick.
- Set the amount. Hover the knob that the kick was connected to and drag the blue ring that appears in the popup window. The ring is the modulation amount in the knob's units.
- Go fullscreen. Click the fullscreen button at the right of the bottom transport bar (5) to maximize the viewport, or click the button to its left to open the view in a popout.
- Customize the editor. Check Settings > Interaction and Settings > Display for options for customizing the editor, including knob drag style and viewport resolution.
- Save. Click the presets button in the settings bar, then click Save Preset. The preset arrows step through the factory bank.
Undo and redo are in the settings bar and use the shortcuts Cmd+Z and Cmd+Shift+Z (Ctrl on Windows).
Objects
Objects render the audio. Every object shares some common settings (placement, opacity, material, deforms, effects) and adds a renderer specific Properties tab.
Object Tree
New objects are added to the top of the tree. Objects at the top of the tree draw over objects below them. Drag to reorder objects in the tree.
Right-click an object in the tree for Duplicate, Copy, Paste, Group, Ungroup, Save Object Preset..., Load Object Preset... and Add renderer.
Tabs
The properties panel shows a row of tabs for the selected item. Which tabs appear depends on the selection:
| Selected | Tabs |
|---|---|
| Object | Transform, Properties, Material, Deform, Effects |
| Group | Transform, Deform, Effects, Compositing |
| Screen | Transform, Effects, Properties, Compositing |
Settings > Interaction > Maintain tab selection keeps the same tab open when switching between items.
Transform Tab
Transform holds the object's placement. The section header carries the 3D checkbox. With it off the object is flat. With it on the object is placed in the scene's 3D space.
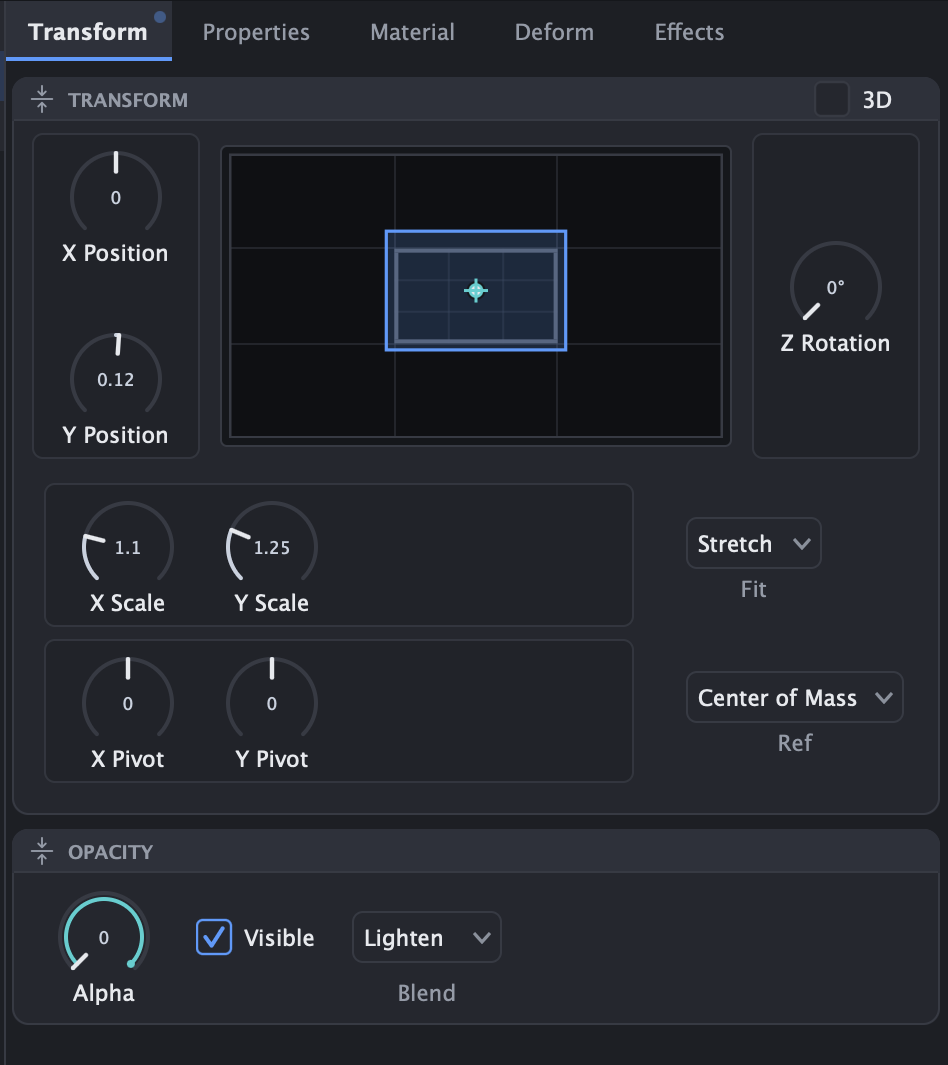
Fit (Dropdown): Determines how the object rescales when the aspect ratio changes. Aspect and Cover preserve the object's aspect ratio. Stretch fills the bounds exactly.
Placement Window
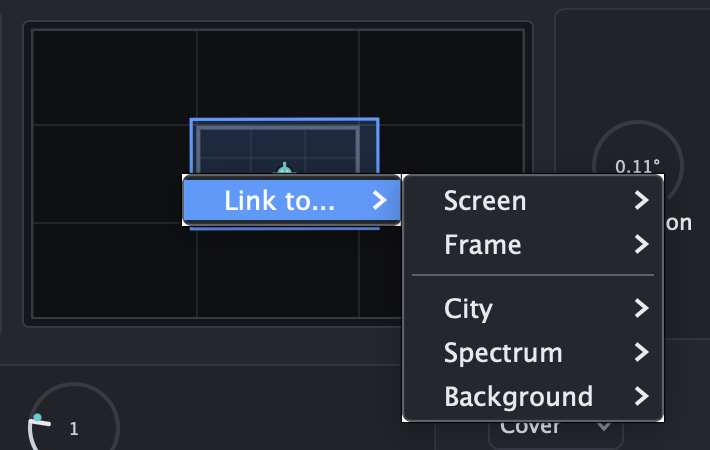
The window beside the position knobs is a view of the object's placement on the screen. Drag the blue area to move the object, drag its edges to scale it, and drag in the empty space around it to rotate it. Right-click an edge of the object to link it to another object's edge. For more information, see the Placement and Edge Links chapter.
Properties Tab
Properties holds the renderer's own parameters. Some Visualizer-specific parameters and renderers are described below.
Spectral
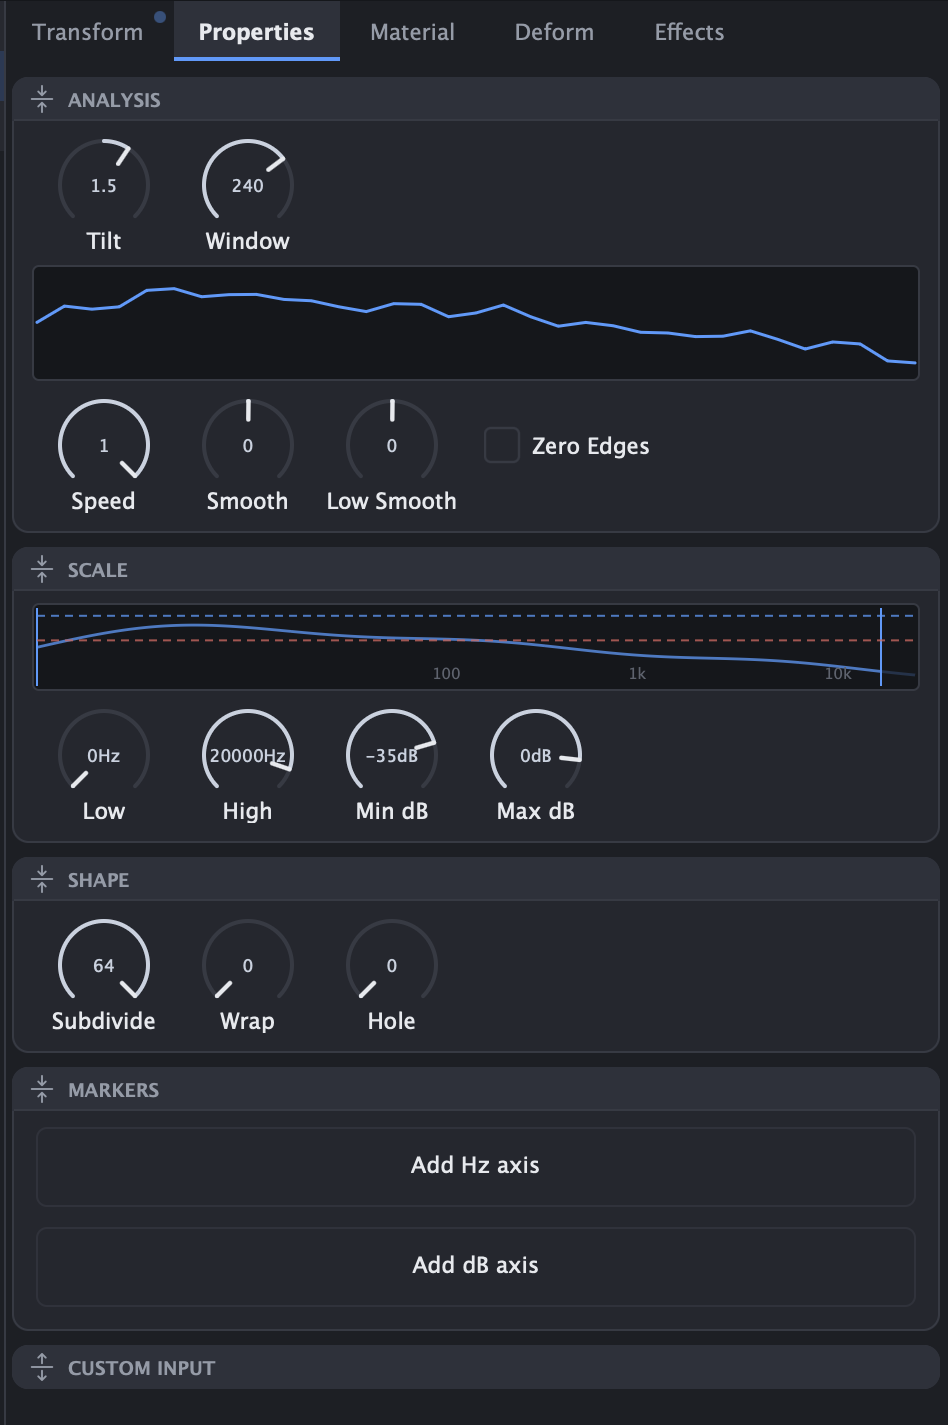
Spectrum, Box Spectrum, Spectrum Lines, Spectrum Curve, Pixel Spectrum, and Spectrogram fall under the Spectral category. Min dB and Max dB are the level range. Every spectral has Add Hz axis and Add dB axis buttons that spawn a labeled axis that follows the original object.
Waveform
- Waveform: With Lock set to Auto tracks the detected pitch so a periodic signal holds still.
- Custom Line: A Lissajous figure driven by three modulator inputs instead of the audio channels. Any modulator wired to X, Y and Z is plotted at audio rate.
Meters
- Meter: Anything wired to the Input knob overrides the internal metering, so a meter can display any value from a modulator.
- Number: A numeric readout. Font size is fixed against the widest number.
- Axis: A ruler. Axes normally spawn from another object's Add axis button, pre linked to that object's edges, but they can be added standalone and linked manually.
MIDI
Piano, Piano Roll, Roll Particles, Pads and Chord render MIDI. They are described in the MIDI chapter.
Text
Text, Number and Lyrics render text. Font lists the system fonts and any file loaded with Load font.... Text is geometry, so every deform applies. An object uses a single font size fitted to the widest content it can show. Scale to Fit overrides this to fit each line to the box.
The Reveal section animates the text in and out by letter, word or line. On Text it is driven by the playhead knob, which is intended to be modulated. Lyrics uses the same system driven by timestamps included in the loaded .lrc file, and is described in the MIDI chapter.
Media
Image, Image Sequence and Video are described in the Media chapter.
Primitives
- Rectangle: A flat quad, which can be used as a backdrop or a matte.
- Shape: A rounded regular polygon. Increasing Z Scale gives the object depth.
- Model: A lit mesh, a built-in primitive or an .obj loaded with Load model.... Detail cannot be modulated. Textures can be loaded to affect the appearance of the model.
- Particle Field: A deterministic cloud of points.
- Particles: An emitter with a simulation. Use Filament to create strands in space and Attraction to pull particles towards them.
Shader
Shader runs a custom fragment shader. See the chapter below for more details.
Material Tab
The Color section has a color gradient and on most renderers a Color By choice to determine how the gradient is applied to the object. A subsection of the gradient can be used instead by changing or modulating the section knob. For manual color modes, the Position knob can choose the specific color.
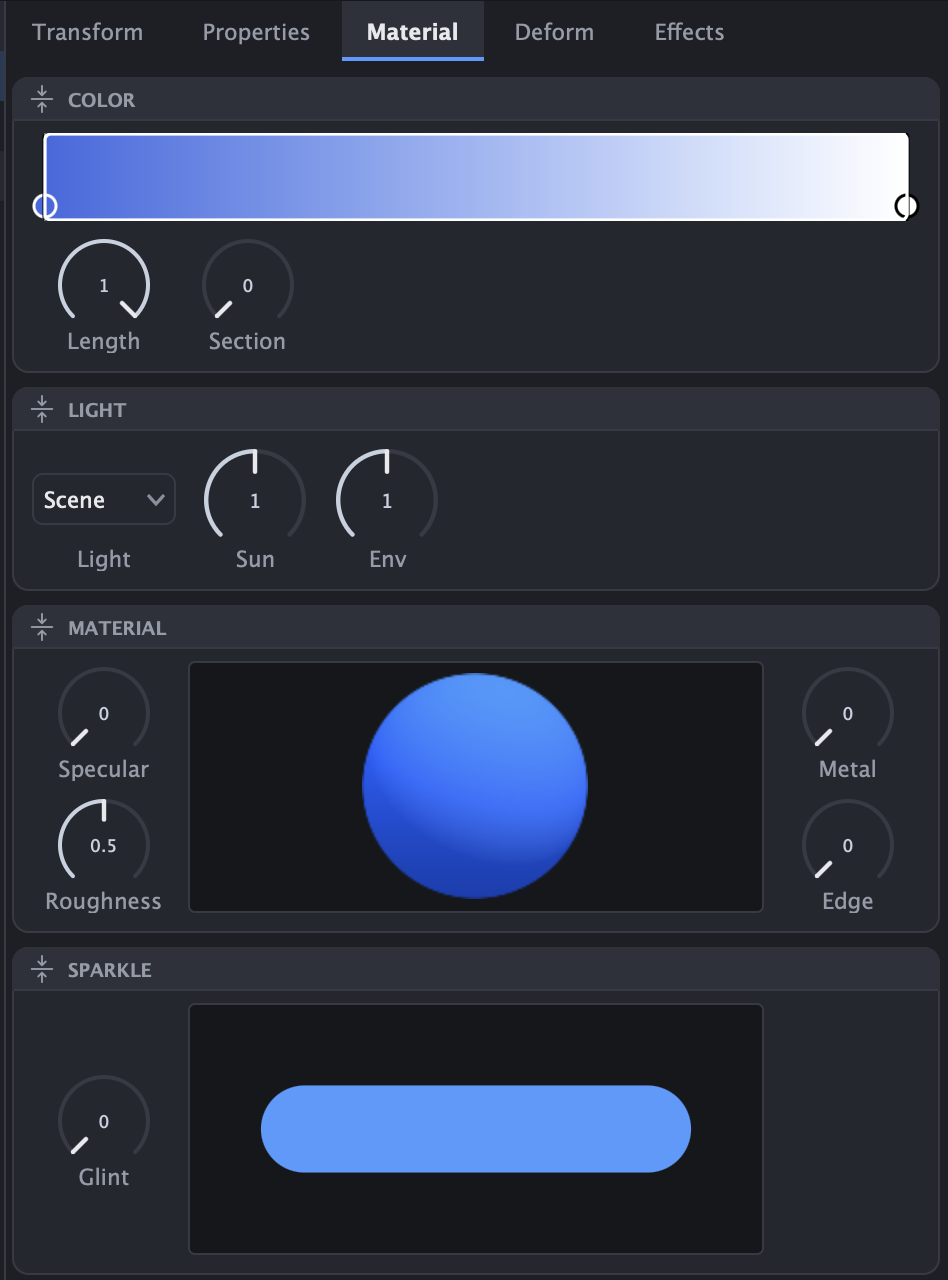
- Light (Dropdown): Flat is unlit, the color is output directly. Scene uses the light and environment set in Screen. Custom gives the object its own light direction.
- Env: The amount of the screen's environment applied to the surface.
The Screen item in the renderer tree holds the settings to change the scene light, Camera FOV, and Environment, where an image (.png, .jpg, .hdr) can replace the built-in environment.
Materials have Sparkle settings to add creative effects to the object's base shading.
Deform Tab and Effects Tab
Both tabs hold a stack of either deform or effect operations. Deforms displace the geometry. Effects operate on the rendered pixels. Both are covered further in the Effects and Deforms chapter.
Groups
Groups are created by selecting several rows in the tree, right-click, and choose Group. A group is positioned, scaled and rotated as one unit, and its deform and effect stacks apply to every member at once. Groups can nest.
A group's Transform tab matches that for objects, plus:
- Frame (Dropdown): The box the group's own Position and Pivot knobs are measured against. Screen means the group's box is the screen. Square means the box is a centered square.
The Compositing tab is mainly used for controlling how sub-objects composite together, and for reframing on aspect ratio changes.
- Compositing (Dropdown): Layered draws the members in order. Occlusion gives the members a shared depth so 3D objects in the group occlude each other. Mask uses the bottom member as a mask for all layers above it. The mask can be a group.
- Reframe: Lock Together freezes the group's frame at the current aspect ratio. When the aspect ratio changes, the objects in the group get repositioned as a rigid unit instead. Fit selects how that frozen frame is rescaled and X and Y pan which part of the frame stays in view. This allows an arranged layout to remain intact across aspect ratios. When designing for a fixed screen resolution or aspect ratio (for example for video export), this setting is not critical. In those cases, it is suggested to lock the viewport's aspect ratio by disabling Settings > Fit to Window. When designing presets for realtime viewing (for example for preset sharing), it is recommended to set Reframe.
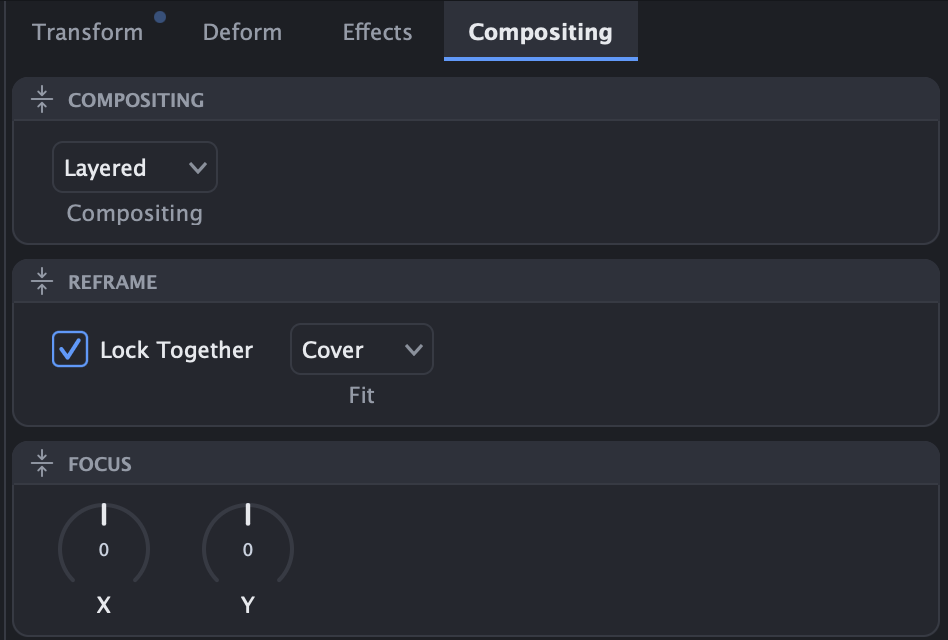
The Screen at the top of the tree is the group that contains the whole scene. Its Compositing tab has the same reframe controls, so an entire preset can be locked to an aspect ratio, and its Effects tab applies to the finished frame. It is suggested that expensive effects are included on the Screen instead of on individual renderers to save performance. See the Effects section for more information on effect performance.
Modulators
Modulators are the program's control sources. Each one produces a stream of values at audio rate, and almost any knob on any object, effect or deform can be driven by it.
The Rack
The modulator rack can hold an unlimited number of modulators. The Macros bank is pinned to the left (in the plugin knobs are exposed to the host to be automated). The BPM knob sets the global tempo and meter in the standalone version (the plugin uses the host's tempo). Click the Add Modulator button at the right end of the rack to add a card.

Connections
Drag the bar on the left edge of a card and drop it on a knob. That creates a connection. Hover the knob to reveal the blue modulation amount ring, and drag the ring to set the amount that the modulator affects the knob.
Hover a knob that has connections and a menu will list all connection tied to that knob. Each connection has settings:
- Direction: Forward adds to the knob's value, Reverse subtracts from it, Bidirectional spans both sides. Click the arrow to cycle the mode.
- Edit curve: Opens a curve editor. The curve reshapes the modulator's output before it reaches the knob.
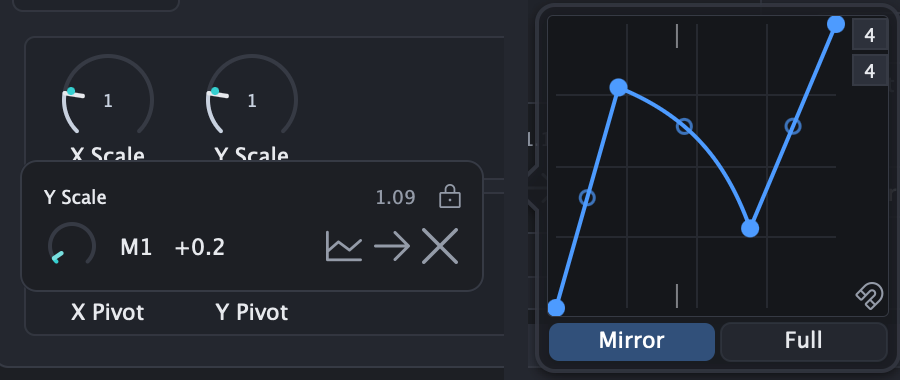
Modulation may push a knob past its extents. The lock icon in the panel header locks it at the extents instead. Some knobs may not go past its extents due to technical limitations. Additionally, a few knobs cannot be modulated at all. A red warning message is displayed when attempting to modulate a knob in either of these cases (shown in the hovered connection menu popup).
Dropdowns and checkboxes cannot be modulated, but they can be linked to another control of the same kind. See Control Linking below.
The Modulators
Unipolar modulators output 0 to 1. Bipolar modulators output -1 to 1 and are noted below.
Tempo and clock
| Card | Purpose |
|---|---|
| BPM | The global tempo and meter. The knob is modulatable. |
| LFO | A repeating curve. Sync locks its phase to the timeline clock so an export is repeatable. BPM makes the rate based on the beat divisions instead of a frequency. |
| Trigger LFO | A curve that triggers its curve once each time In crosses Gate. |
| Steps | A step sequencer. Click and drag on a strip to edit the pattern. |
| Counter | Counts the number of times the input crosses the gate. The count is wrapped based on a set parameter. |
| Clock | Controls the transport clock offset. Everything that uses time (lyrics, time cards, keyframes, video sync) uses the offset time. |
| Time | The transport time as a modulation source. Start and End map a window of the clock onto 0 to 1. Once clamps the value, Loop wraps the value, and Pendulum bounces at the ends. |
Audio
| Card | Purpose |
|---|---|
| Signal | A channel's level, or the raw audio (a bipolar output) in Signal mode. dB maps the level onto the app's internal dB scale. |
| Follower | An envelope follower. Duck filters out lower frequency content, allowing for the finding of transients (Greater Baseline values detect longer transients). |
| Band | An envelope follower that listens to a chosen band of the input audio. |
| Kick | Roughly detects kick drum onsets. Increasing Sens increases kick detection sensitivity. |
| Filter | A signal filter on a bipolar input. |
| Gain | A pass through with gain that supports bipolar output. |
Shapers and logic
| Card | Purpose |
|---|---|
| Math | Takes two inputs and an Op and outputs the result. Wrap folds the result into the valid range. Supports bipolar inputs/outputs. |
| Boolean | Two inputs thresholded at Gate and combined by the chosen logic. Outputs 0 or 1. |
| ADSR | Outputs the signal after an attack, decay, sustain, release envelope is applied. Sustain lasts as long as Input stays above the Gate. |
| Random | Hold mode creates steps between random values. Glide mode creates ramps between random values. Chaos mode is a chaotic system random generator supporting bipolar output. Random values are deterministic per-modulator. |
| Keyframe | Allows for keyframes to be placed at any point over the course of a song, each having a value from 0 to 1. Steps mode divides the 0 to 1 range into a given number of steps to allow easier programming. This mode helps automating progress for lyrics using the text renderer. |
| Switch | Allows for switching between up to four values. The input selects which row's value is output based on the cutoffs. Drag the bars to edit. |
| Sample | Samples the input value and holds until the next trigger. When Trigger rises past the Gate value, the modulator locks the output to what the Input reads and holds it until the next rising edge. |
Events and manual control
| Card | Purpose |
|---|---|
| Event | Outputs 1 when a trigger is emitted by an object, such as a Lyrics line word change, or a Video loop. Select the source object and the trigger, and the output pulses for Hold seconds. |
| Macros | Four manual knobs with no input. Wire each to many targets to control them from one place. This does not support host automation. |
| MIDI File | Streams a .mid file for MIDI renderers to use in sync with the transport. Lookahead streams notes early for objects that display them ahead of time. |
| MIDI Gate | Outputs 1 while a matching note is held, pedal sustained notes included. |
Worked Examples
Kick punch. Add a Spectrum renderer and a Kick. Drag the Kick's connection bar onto X Scale, and then onto Y Scale. Set both amounts to about +0.1 by hovering the X Scale and Y Scale knobs and dragging the blue dial. Increase or decrease the Kick's Sens until the pulse matches the song's kicks well.
Transient to bloom. Add an object, and put a Bloom effect on it (or place the Bloom effect on the Screen in the tree to affect everything in the scene). Add a Follower and set Duck to roughly half. Drag the Follower's connection bar onto the Bloom effect's Amount. The effect now pulses with transients.
Orbit. Add an LFO with BPM on and drag its connection bar onto a renderer's X Position. Add a second LFO with the same division, offset its Phase by a quarter cycle, and drag it onto the renderer's Y Position. Hover both knobs and set the connection direction to Bidirectional.
Auto Input Gain
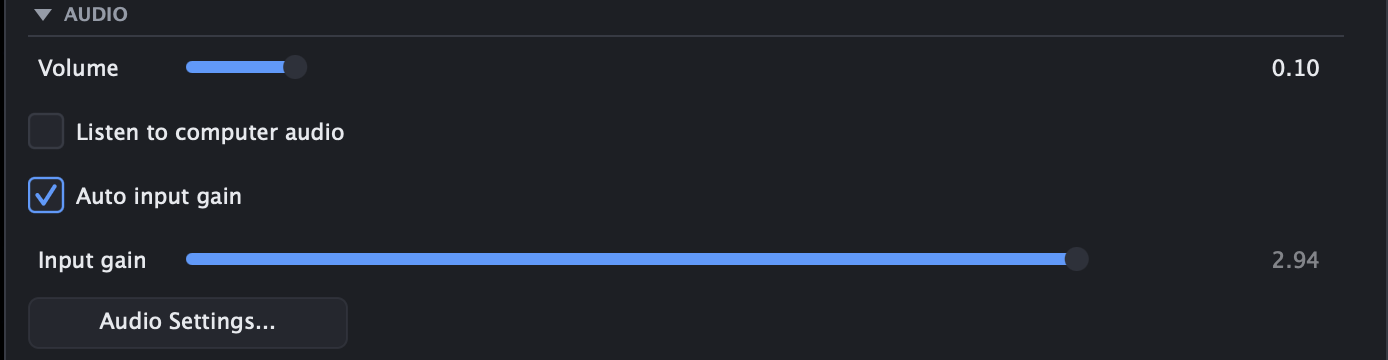
When the app uses computer audio, the analysis level depends on the system volume. Settings > Audio > Auto input gain learns the system volume over a few minutes of playback and corrects for it, allowing improved modulator response without manual gain adjustment. Disable it to set Input gain manually.
Placement and Edge Links
Every object's placement view in the Transform tab allows linking the object's position to other objects. This is done by linking one edge of a renderer to the edge of another renderer. This allows for improved reflows when the window aspect changes.
Linking an Edge
Right click an edge in the placement view and choose Link to.... Choose a target renderer and select which of its edges to follow. Two additional targets are in the list:
- @screen is the live viewport.
- @frame is the screen viewport after transformations are applied. Link to frame to allow an object to still move with the screen's transforms.
Once an edge has a link, its position knob becomes an offset from the linked position. Right-click the edge again to Unlink.
Link Behavior
Links resolve differently depending on the Fit mode. In Stretch fit, a link resizes the object to move the edge to the desired position. Link opposite edges to two different objects with Stretch on to make the object span exactly between them. Aspect fit attempts to maintain the object's aspect ratio.
Companion Objects
Some objects provide companions. Every spectral and waveform object has Add axis buttons, and the Piano and Piano Roll have a Companions section. A companion spawns a related object with all knobs linked. Both the edge and parameter links can be edited.
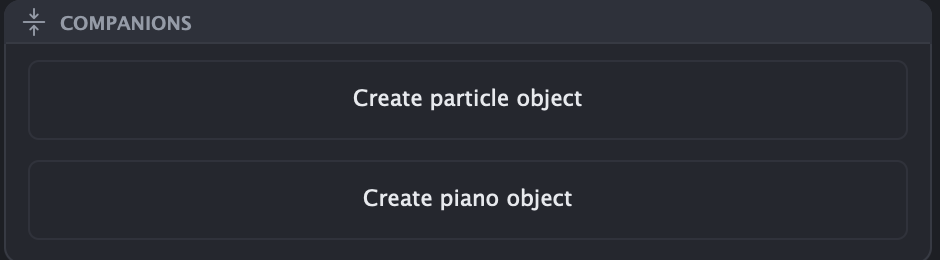
Example. Add a Piano and click Create piano roll object. The roll appears above the keyboard with its bottom edge linked to the keyboard's top edge and its sides linked to the keyboard's sides. Now open the roll's transform viewer, unlink its top edge, and link it to @screen's top. Then make sure the fit mode is set to Stretch. This makes the piano roll fill the space above the keys at any window size.
Control Linking
Any two controls of the same kind can be linked, so that one follows the other.
For knobs, right-click the follower knob and choose Link to..., then find and click the target knob. The follower becomes target value × Ratio + offset. Hover the following knob and the link edit panel appears with the ratio, the offset, and Unlink. Symmetrical and Asymmetrical select whether the ratio is applied from the knob's center or from its minimum.
For dropdowns and checkboxes, right click the control and choose Link to..., then select a target from the menu. The follower copies the targets's value whenever it changes. Directly editing the follower unlinks it.
Effects and Deforms
Deforms modify the geometry of an object while effects edit the rendered pixels. Each object may have any number of deforms or effects. Groups and the Screen may also have both. Deforms on Groups or the Screen are applied to each subobject individually. Effects on a group applies to the members as one layer, and effects on the Screen applies to the finished frame.
Stacks
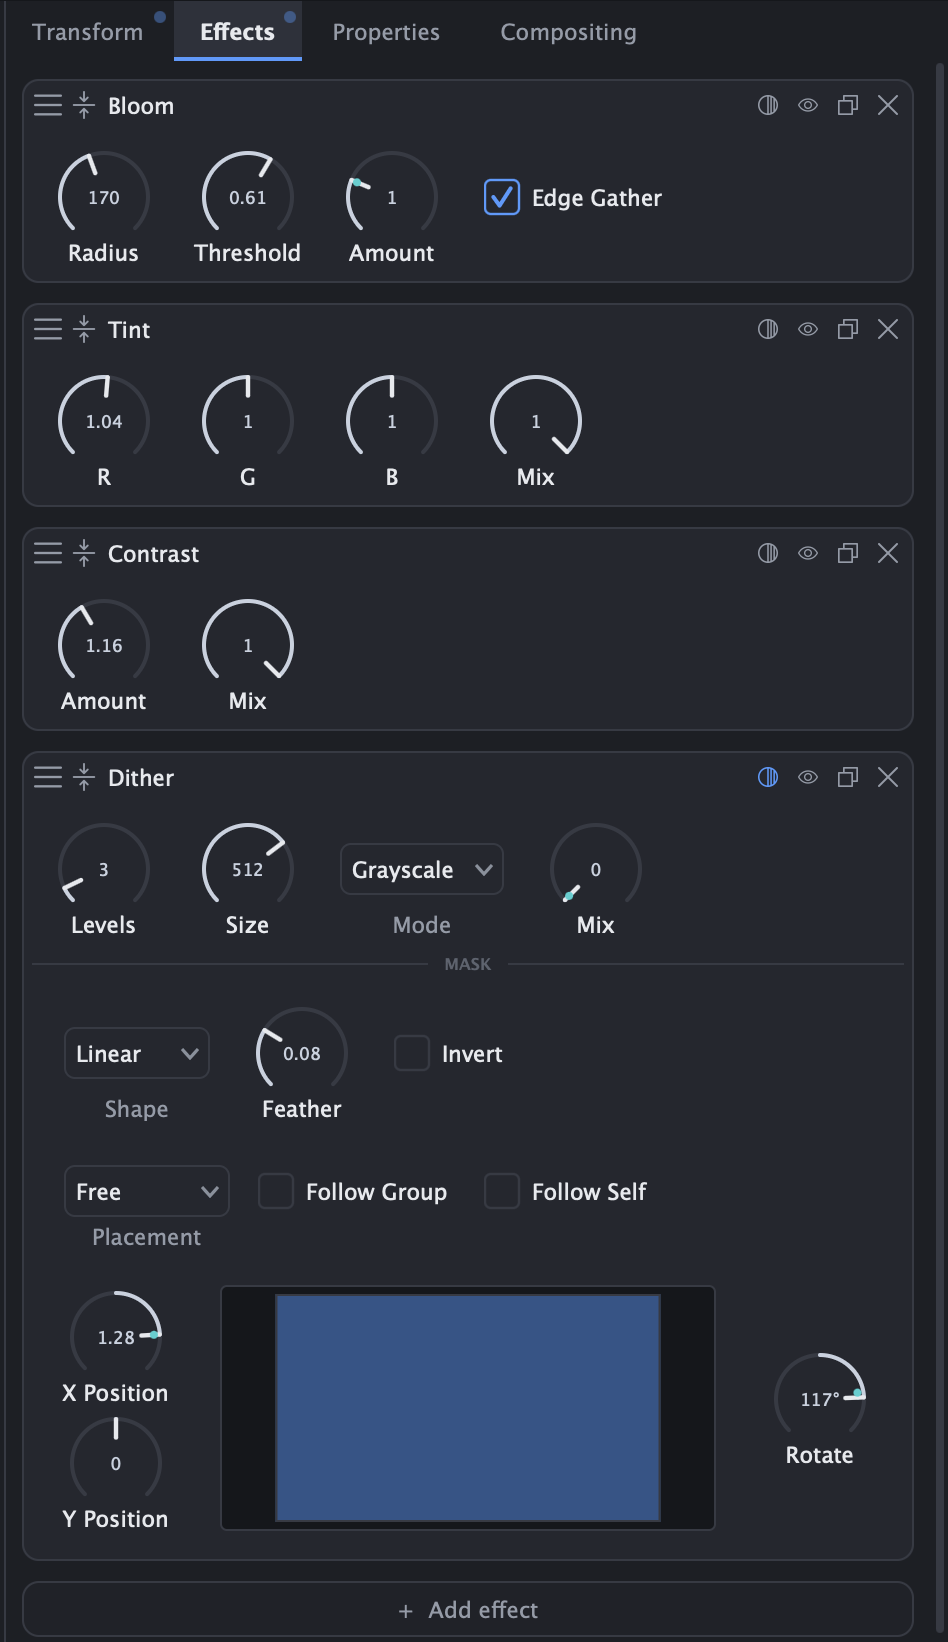
Click Add effect or Add deformer at the bottom of the respective tab. They are applied top to bottom. Each has an active toggle in its header. Every knob on a card is modulatable like any other.
Effects
Most effects are fully described by their name and parameters. Below are some effects with additional detail:
Trail keeps a decaying copy of previous frames added under the current one. Decay sets how long a frame persists. The remaining knobs modify the decaying copy as a feedback loop, so Hue rotates the hue of the decaying trail more each frame and Zoom scales the history further each frame.
Color Convert selects one color neighborhood and remaps it. Hue and Hue Range select a hue band, and Bright Range select a brightness band. Either range set to the maximum extent of the knob disables that selector. New Hue and New Brightness are the target color of the remap.
Glass refracts whatever renders behind it.
Custom Shader runs a custom fragment shader as an effect. The rendered object is bound as iChannel0. Audio and noise channels are bound in the same way as on the Shader object. Amount is the dry/wet mix. It is described in more depth with the Shader object in a chapter below.
Effect Performance
Effects can quickly add up to be highly performance intensive, especially at high resolutions and frame rates. The general rule for improving performance is to use cheap effects wherever desired, but applying expensive effects at the highest level possible. For example, instead of applying Bloom to every object individually, try to apply it only once at the screen level (a mask can be used if only portions of the screen should have bloom). Here is a list of every effect with their performance impact:
Free: Invert, Brightness, Tint, Contrast, Saturation, Hue Shift, Color Convert, Mono, Sheen, Gradient Map, Posterize
Medium: FXAA, Trail, Vignette, Mirror, Ripple, Swirl, Marble, Turbulence, Fuzz, Bulge, Kaleidoscope
Expensive: Blur, Bloom, Emission, Glass
Additional Details (Advanced Usage):
- Adding free effects to an object directly is cheap, but the first free effect added to a group incurs an extra performance cost.
- The first deform-type effect added to any object or group incurs a cost, but any added after the first is free.
- Image and Image Sequence support baking effects by right-clicking on an effect and selecting Bake. Any baked effect is free.
- All of the above information is most critical for realtime performance. Exports are not affected by performance besides taking longer.
Deforms
Deforms operate on geometry. Due to geometry being required for deforms to function, increasing the Subdivide or Quality parameters in supported objects can increase deform fidelity.
Here are a few special deformers worth mentioning:
Displacement and Radial read audio over time and displace vertices by it. Part and Word Drift are listed only on the text family of objects, and displace whole words or parts rather than vertices.
Masks
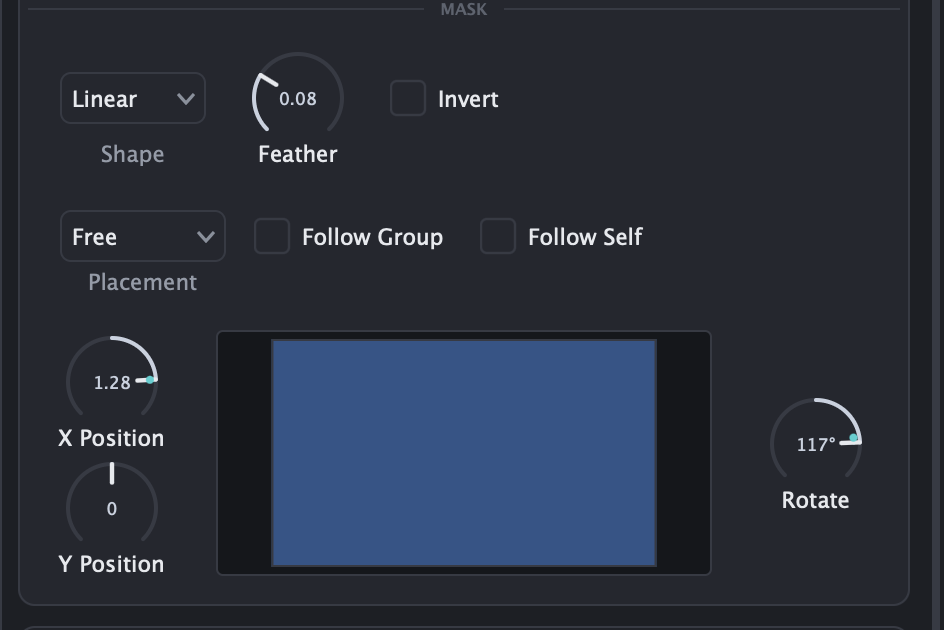
Any effect can be masked. Click the mask icon on the top right of the effect and the controls will appear:
- Placement (Dropdown): Free places the shape with its own position, scale and rotate knobs. Attach binds it to an object's or group's drawn frame, picked with Target. Rectangle links each side of the mask to an edge, similar to the edge links described above. Click an edge of the frame to select its target. An unlinked side is positioned on the screen edge.
- Follow Group and Follow Self: Whether the mask inherits the group's transform, and/or the object's own transform.
Deforms can not be masked.
Media
Image
Load image... selects an image to be displayed. Effects can be baked by right-clicking on an effect, and selecting Bake. Any baked effect is free. Baked effects must be first in the effect stack.
Image Sequence
Add images... and Add folder... create a list of frames, ordered by numbers in their file names. Images can be reordered after being selected. Playhead controls which frame is visible.
Effects can be baked by right-clicking on an effect, and selecting Bake. Any baked effect is free. Baked effects must be first in the effect stack.
Video
Load video... accepts .mp4, .mov and .m4v.
- Sync to transport locks the video to the transport clock so it seeks with the transport. This makes the video play/render deterministically with the music. The Speed knob is not modulatable while sync is on.
- Chroma Key: Hue selects the color to remove. Threshold sets the hue distance. Softness allows for a soft edge falloff.
- The video looping fires a trigger, so an Event modulator can detect a video's looping.
Asset Paths
A preset stores paths to its media. When a preset or object preset that references files is saved, the app asks how the paths should be stored:
- Copy files copies them next to the preset, so the preset can be moved or shared with an asset folder.
- Keep Location In Preset Folder points at files already inside the presets folder. Moving or sharing the whole folder keeps every path valid. If some files are not already in the preset folder, they will be copied next to the preset.
Absolute paths are currently not supported due to portability concerns.
MIDI
MIDI Input
The plugin receives MIDI from its host. The standalone can source MIDI from a MIDI File modulator, which streams a .mid in sync with the transport. Every MIDI object has a Channel filter. Some objects support Apply Sustain with Sustain Decay to decide whether pedal sustained notes stay active and how they last.
Piano Setup
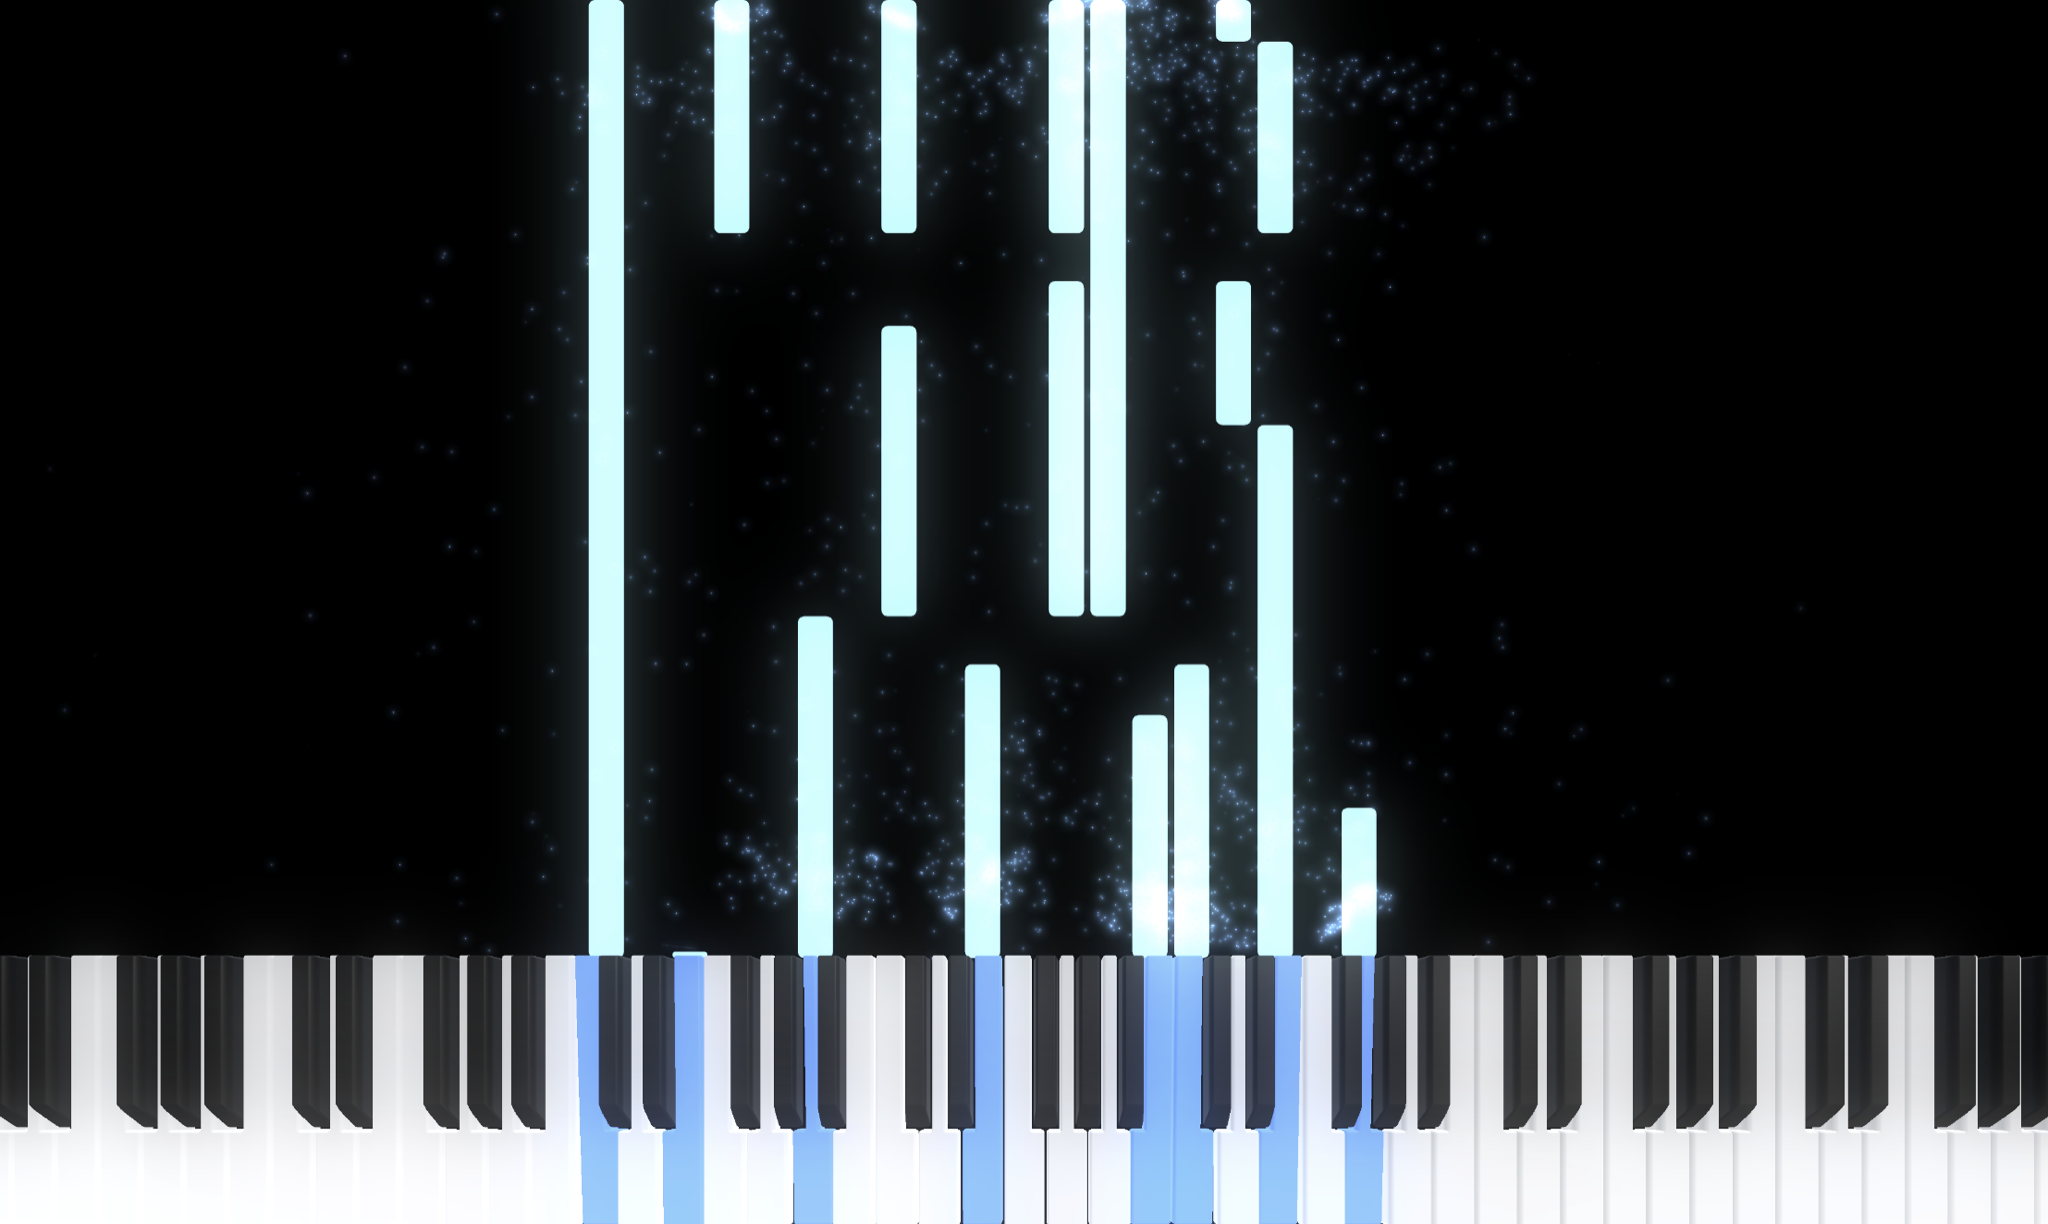
- Piano: A 3D keyboard that lights the held notes according to the material color gradients chosen. Set the keys and piano roll Lookahead to the same value to make the keys light in time.
- Piano Roll: Notes can travel towards or away from the keyboard. Time is how long the notes take to traverse the given distance. Lookahead controls how far into the future the spawning of notes occurs. This is useful for the falling style of piano roll. When using lookahead, live input must arrive that far ahead. Use the the MIDI File modulator Lookahead parameter to achieve this. Or, use plugin latency controls in a DAW.
- Roll Particles: Particles emitted from the notes on the same lanes as the roll.
The three can be created together by adding a piano, then adding the other two using the Companion controls. All three have a Lookahead knob, and companions are created with it linked.
Pads and Chord
- Pads: A grid of pads in launchpad order lit by velocity from Note upward.
- Chord: Displays a live chord name for the currently held notes. Mode selects the complexity of the notation style, with Notes printing the held notes instead of the full chord. Numerals prints roman degrees using the provided Key. The sustain controls determine if piano sustain affects the displayed chord, and for how long released notes are considered. These controls act identically to how Piano and Piano Roll function.
Lyrics
Lyrics is a text object driven by timestamps.
- Load lyrics... accepts an .lrc file or a plain .txt, though a .lrc file is recommended. Generally, .txt based lyrics can be better automated using a Text object.
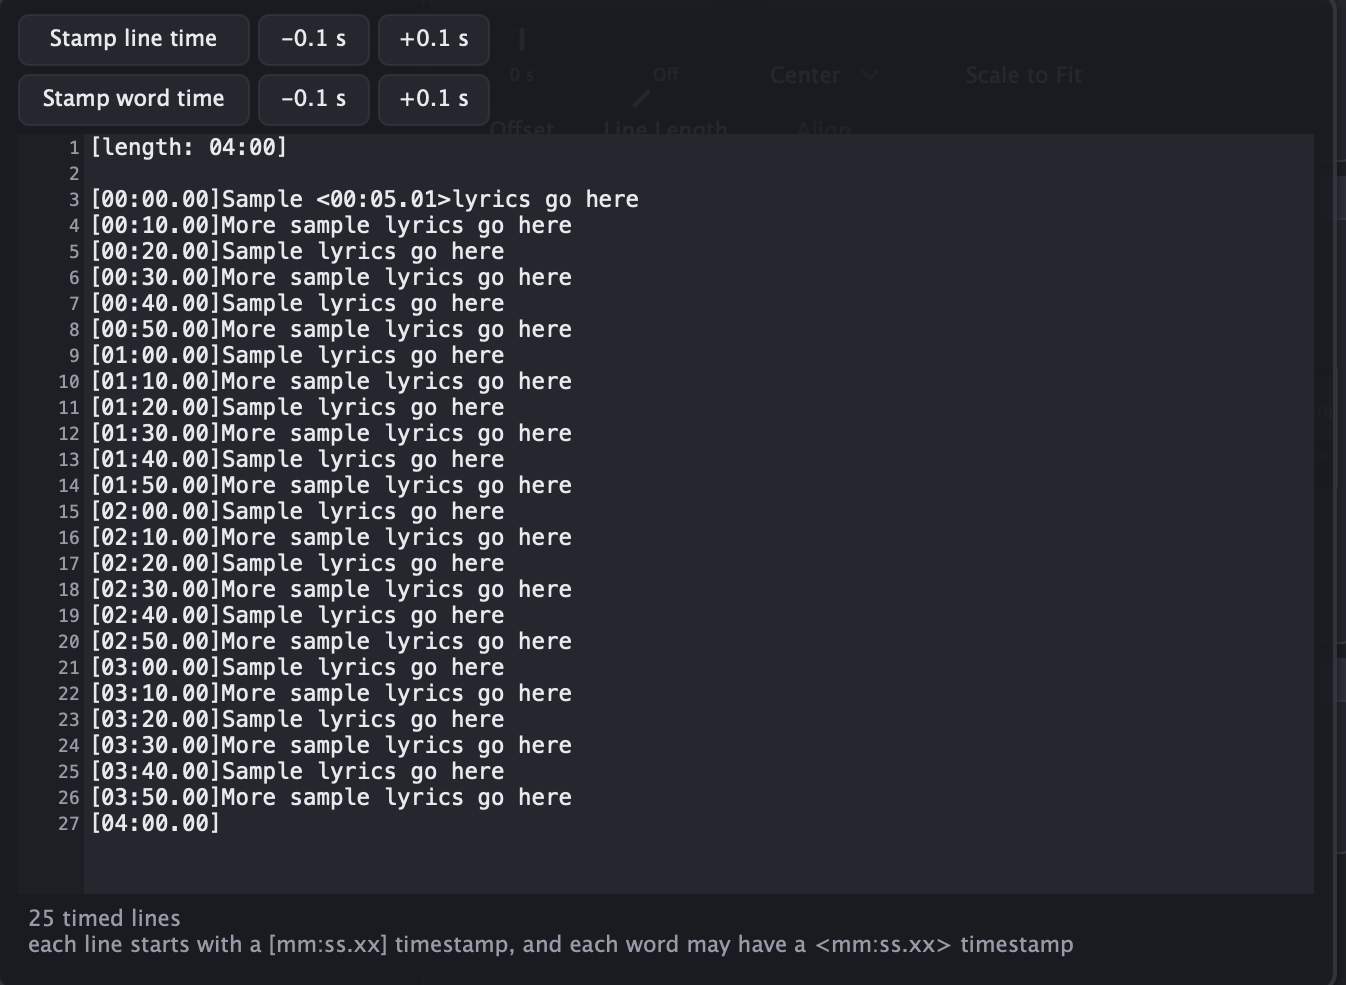
- Edit... opens the text editor. Each line starts with a
[m:ss.xx]timestamp. Play the song and click Stamp time to write the current transport time. - The object's Reveal section matches that from the Text objects, but instead of using a playhead knob, each line activates at its timestamp and transitions over Smoothing seconds. Max Hold controls the maximum time a line will be displayed on screen after its timestamp has passed, with 0 being forever.
- Every line change and every word change fires a trigger. Add an Event modulator, select the Lyrics object and Line or Word to track these changes.
The lyric text is embedded in the preset. The file path is stored only as a reference.
Shader Objects and Shader Effects
The Shader object runs a Shadertoy style fragment shader. The API is Shadertoy's. What follows covers only the differences. For the basics see shadertoy.com/howto.
Shared with Shadertoy
void mainImage(out vec4 fragColor, in vec2 fragCoord), iTime, iTimeDelta, iFrame, iFrameRate, fragCoord with Y up, and iChannel0 as the audio texture.
Differences
| Uniform | Behavior |
|---|---|
iResolution | The object's on screen pixel footprint. Scaling the object will reframe the shader instead of stretching it. |
iAudioA, iAudioB, iAudioC | Three audio rate float inputs, driven by the In A, In B and In C knobs on the card snapshotted per-frame. |
iChannel0 | 512 × 1 RGBA. R, G and B are the recent history of In A, B and C, oldest on the left, newest on the right, centered at 0.5. Hold A, Hold B and Hold C set how many seconds the texture covers. This texture is the main method to use audio history, as storing information is not supported. See docs/examples/sonic_shockwave.frag for a usage example. When FFT is on, that channel becomes a spectrum rather than holding a raw history of the signal input. The values are not centered. 0 is silence and 1 is a full scale sine, on a linear amplitude and linear frequency scale. The texture spans 0 Hz up to 256 / Window Hz. If nothing modulates the Input knob, the spectrum is automatically taken from the audio itself. If a modulator is connected, the spectrum is computed from that signal. |
iChannel1 | 512 × 512 white noise texture. |
iChannel2 | 512 × 512 tileable perlin noise. RGB are three independent octave fields, A is a five octave fBm. |
iMouse, iDate | Zeros. |
iChannel3 | Not present on the object. The Custom Shader effect uses it. |
| alpha | Output alpha composites the object over the scene. |
Additional Notes
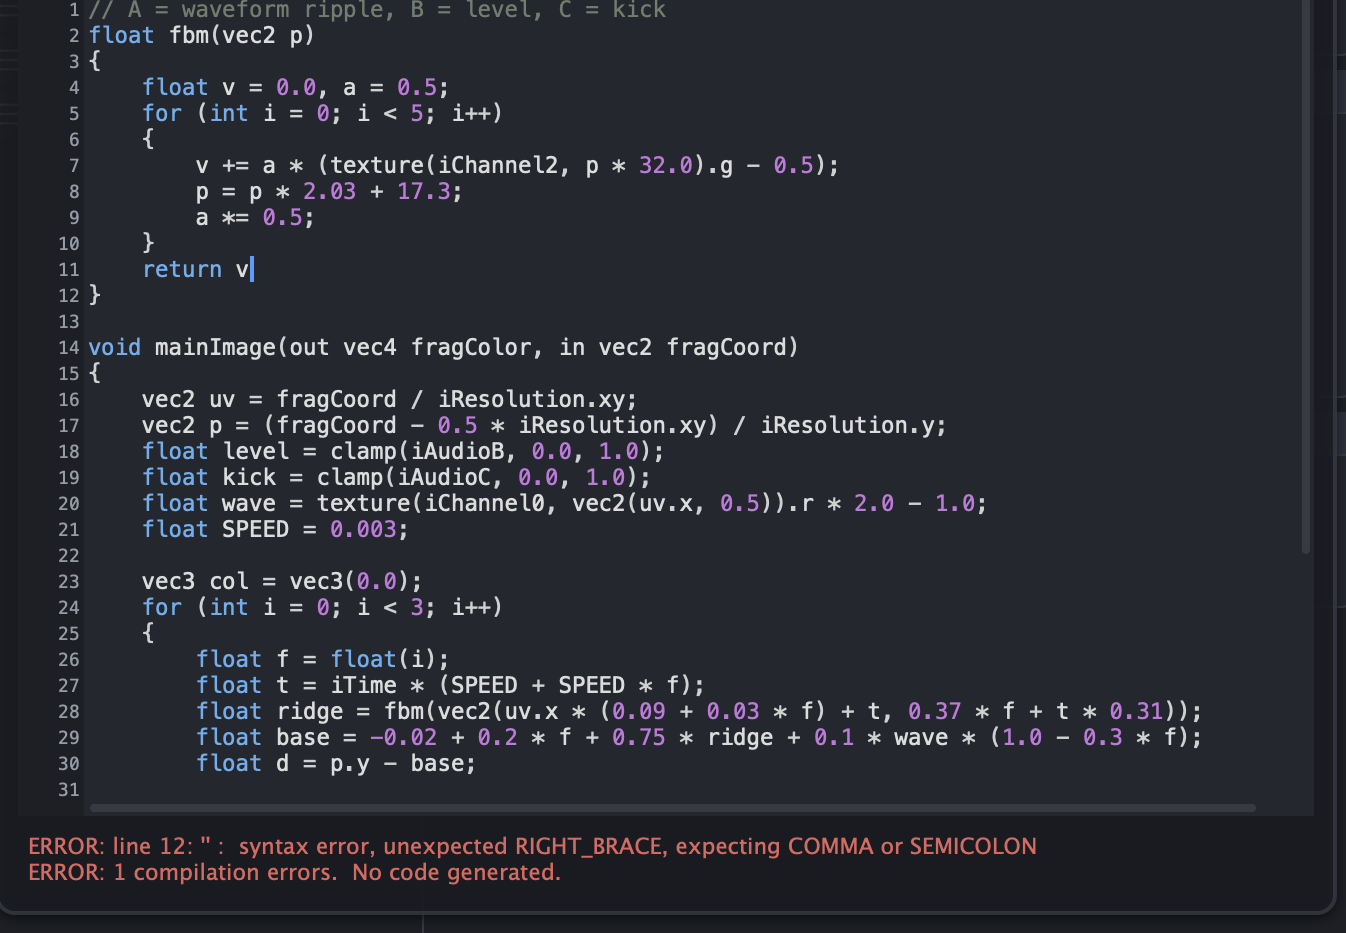
- Edit source... opens the inline text editor. Compile errors are shown in this screen. Inline source is saved embedded inside the preset.
- Load shader... loads a file. The object recompiles on save, so external editors can be used.
- A broken shader keeps the last valid version. A shader that causes a GPU stall is stopped until it is edited or reloaded.
- Stretch is the default Fit, since the shader redraws for the footprint it receives.
- A comment at the top of the shader formatted with "// A = Kick" or "// A = Ripple, B = Level, C = Kick" will name the parameters.
The Custom Shader Effect
The same API as a custom shader object, with three differences:
iChannel0is the rendered object (or rendered object with prior effects).fragCoordhas its origin at the top left, sotexture(iChannel0, uv)is the identity. Certain Shadertoy ports may flipuv.y.- The In A, B and C history strip is on
iChannel3instead. - Amount is a dry/wet mix over the output.
Everything else is identical. Custom effects, even before considering the shader code written, fall into the Expensive performance cost category. They should be used deliberately, and where possible, combining multiple custom shaders into one is best for realtime performance.
Output
Display
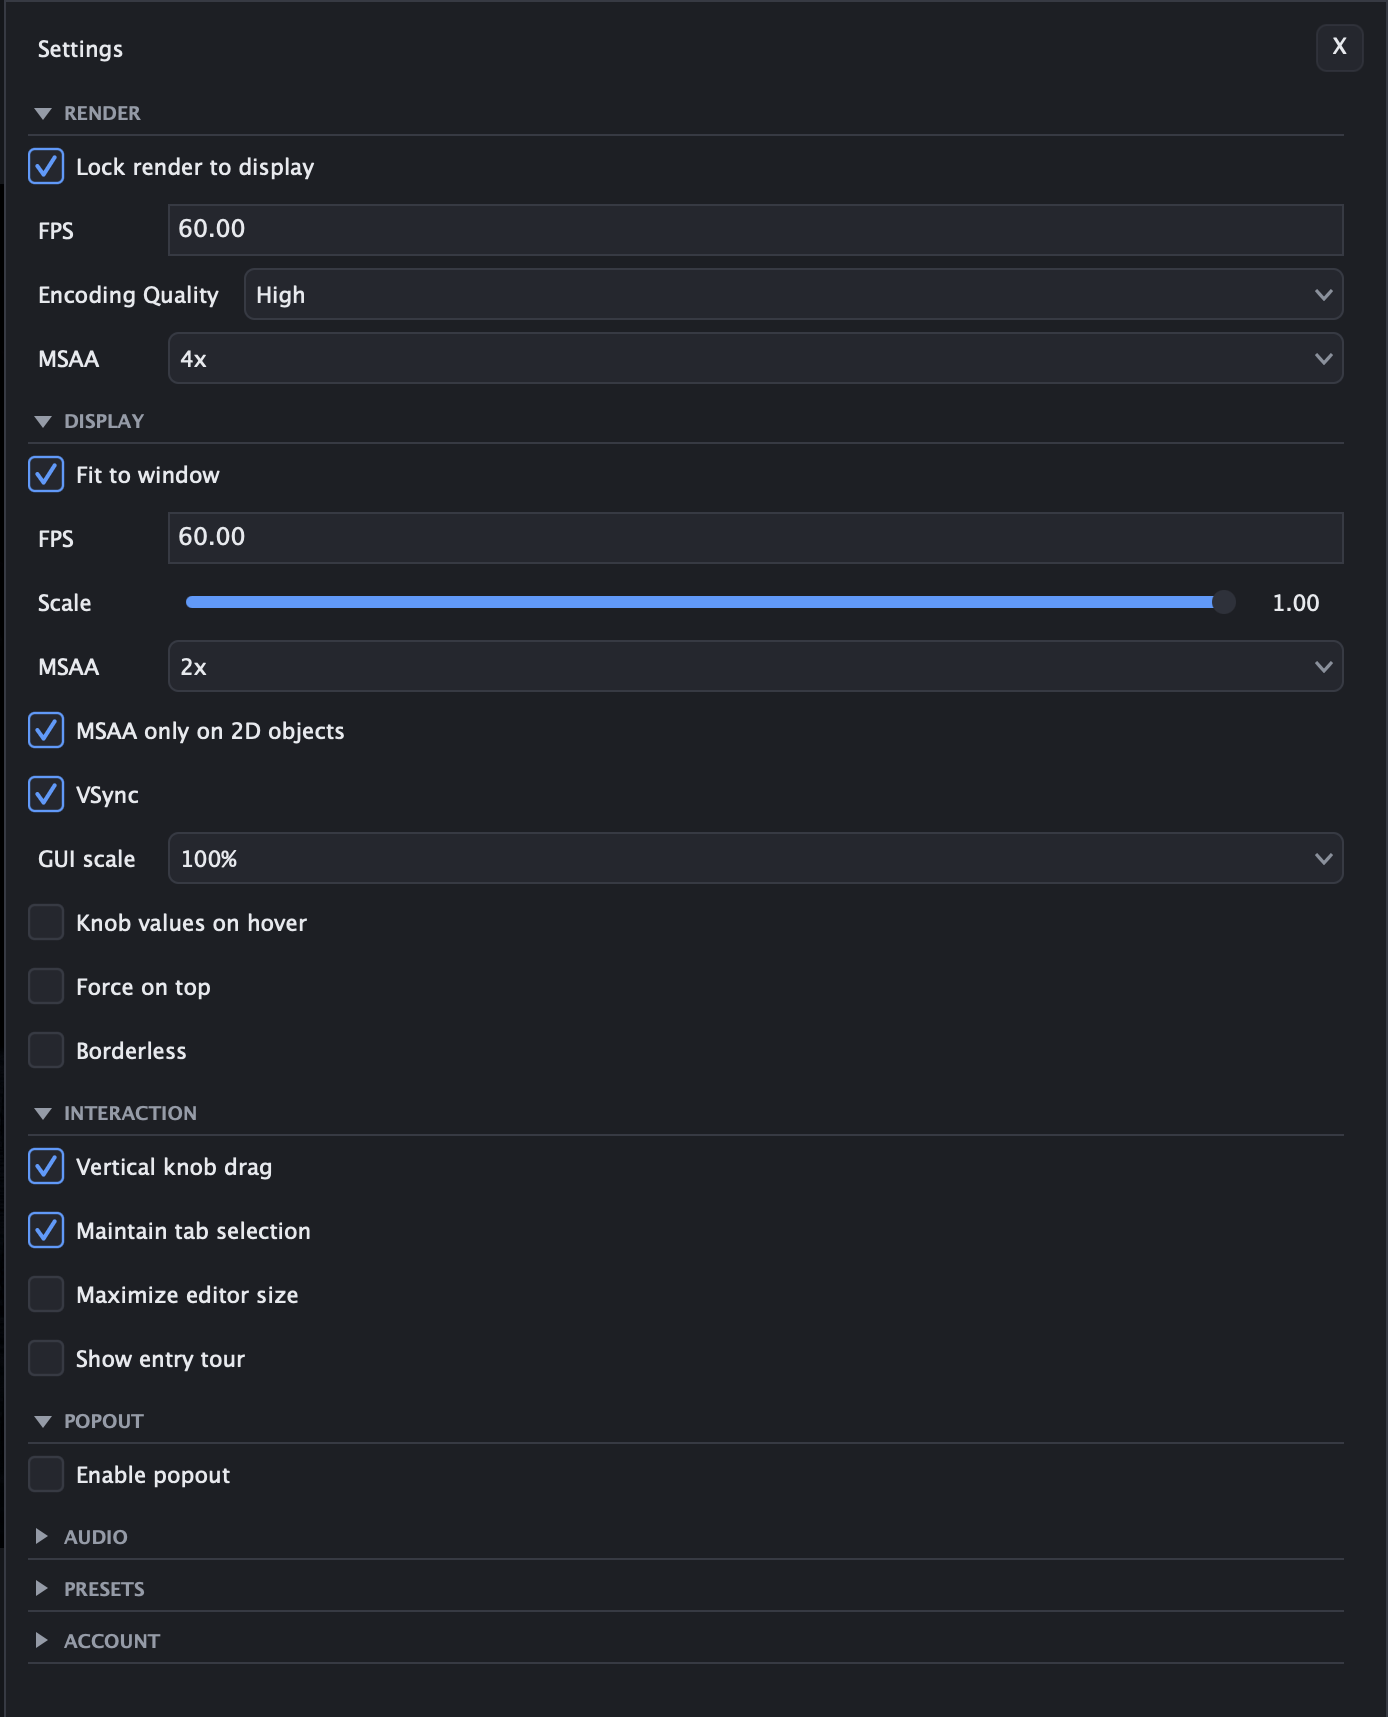
Settings > Display contains the settings for the live view. Scale renders at a fraction of the display size and upscales. MSAA only on 2D objects excludes 3D objects from the anti aliasing cost.
Popout
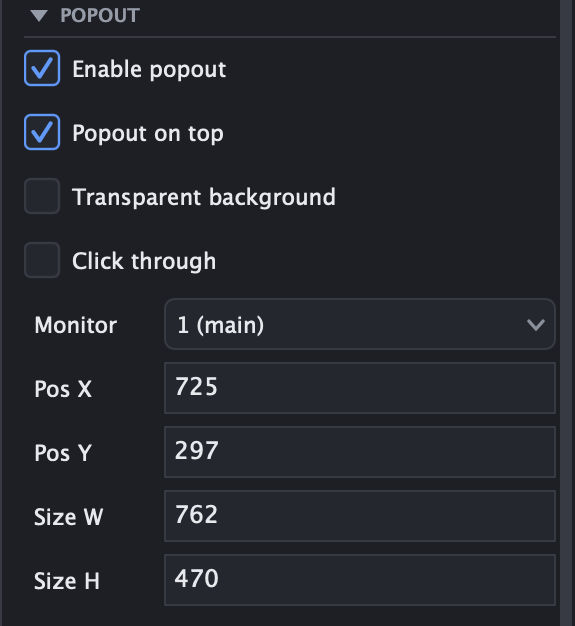
The popout button in the transport bar opens the display in its own window. Settings > Popout:
- Transparent background renders the window with transparency. The objects will display over the desktop or a DAW.
- Click through passes mouse input to the window below. The Monitor, X, Y, W and H fields then place the window, since it can no longer be dragged when this setting is on. The click through button beside the popout button in the transport bar toggles it off. It is suggested to place and scale the popout window, then turn on click through for ease of use.
System Audio Capture
The headphones button at the left of the transport bar (Settings > Audio > Listen to computer audio) enables the capturing of the system's audio output. If the toggle is on but nothing reacts, macOS is withholding the audio: allow the app under System Settings > Privacy & Security > Audio Recording, then restart the app.
Export
Settings > Render configures the export. Lock render to display copies the display size for the export. Exports always render every object at full quality regardless of the display settings.
In the standalone app, the render button in the top settings bar prompts for an .mp4 path and renders the loaded song offline. The render is deterministic.
In the plugin, the render button arms the export. The next bounce in the host renders the video alongside it, to the path shown by hovering the export button. Click again to disarm.
Presets
Scene Presets
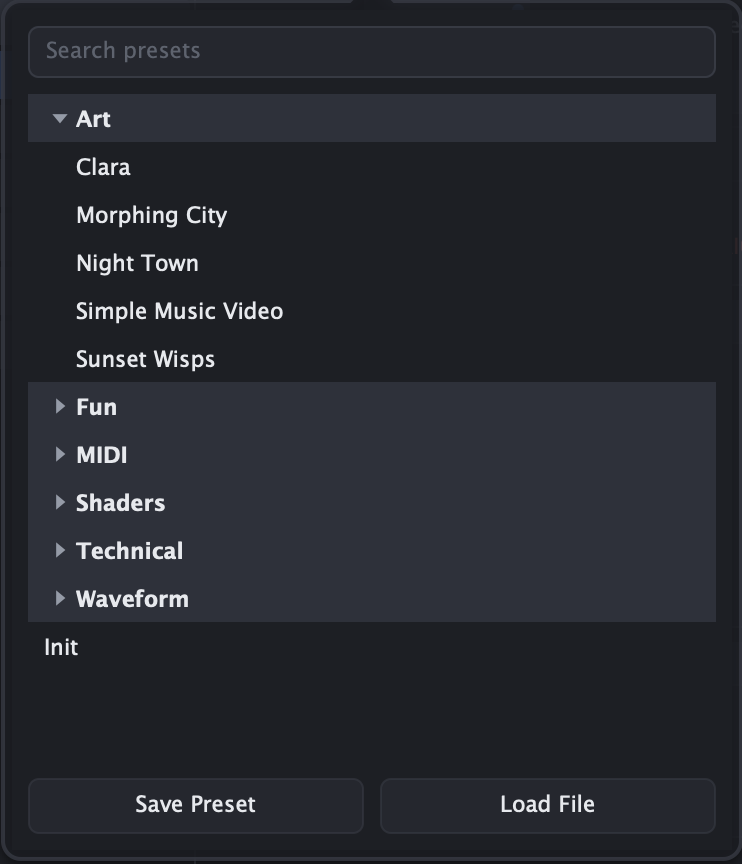
A scene preset (.vizpreset) saves a complete scene. The presets button in the top util bar opens the browser. Click Save Preset at the bottom of the preset browser to save a copy. Presets in subfolders show as folders in the app's browser.
Object Presets
Right click any object or group in the tree and choose Save Object Preset.... An object preset (.vizobject) carries the object with its deforms, effects, edge links, and the modulators wired to it. Load Object Preset... loads the saved object with any modulators wired to it into the project. Media files use the format explained in Media chapter.
Settings
Settings > Interaction has settings to set the knob drag style and Show entry tour. Settings > Account has settings for sign in, purchase and Check for updates.